
February Blog
Building on our work in January, we continued to work on the new electronic tray. While we didnt get in the pool, we were able to do a lot of bench testing.

We started off the month by soldering the ESCs to the power distribution board. We spliced the signal wires longer to reach the Pixhawk, and started soldering the male connectors to the ESCs. We tried to make the wire length as short as possible to keep the amount of wire that would be in between the end cap and the circular end to a minimum.

After finishing all the soldering connections, we ran a bench test with the electronics. The first issue was that the power switch was dodgy, and while trying to run tests with the switch we found it difficult to turn since it was in the middle of the end cap. To deal with this, we moved the switch to the outer edge of the end cap so that there would be more room for us to turn the switch. The button part of the switch had to be tightened more so that the pieces would consistently connect when we turned the switch. The second problem we ran into was the Pixhawk power connection. Since the JST connector was not fitting nicely, the power connection was dodgy. We replaced it with the one from the old tray and it worked much better. The whole tray was functioning properly and connected to qGroundControl.
One thing to note is that the system was drawing 0.01 mA of voltage while the switch was off. This is not good because this would still drain the battery while the switch is off, defeating the purpose of implementing the switch in the first place (not having to open the tube and take out the battery after every time we turn on the submarine). We found that there was a resistance between the terminals 30 and 87 of the relay when the switch is off, which should not be possible because this is a mechanical switch and the two should not have any resistance.
After everything was connected, we ran tests on the lights and thrusters. The lights worked correctly but the thrusters won't activate. To fix this, we moved the PWM pins to 1-4 under MAIN instead of AUXILIARY. The thrusters started moving and then we checked the directions of the thrusters, correcting them in the motors tab of qGroundControl.
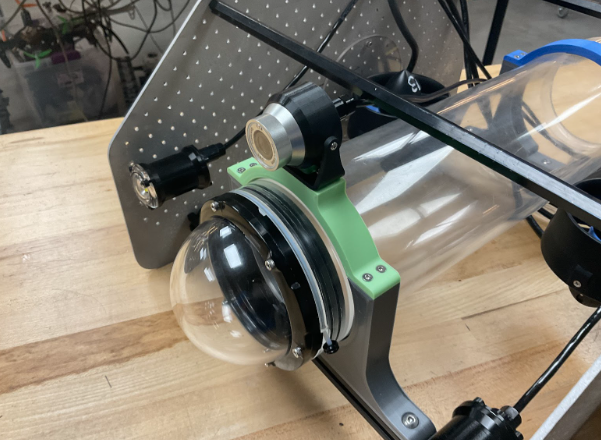
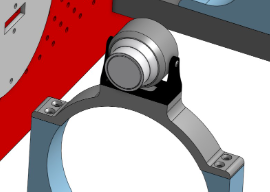
Aside from the electronic tray, we tried to incorporate the new camera into the ROV. The new camera has more range and can film in HD. It also has its own cable and can be placed outside of the tube. In order to attach it to our ROV, we modified the tube clamps to incorporate the new mount. Once attached, we pushed the cable through a 4.5mm wetlink penetrator that is used to waterproof the tube.
The current firmware on the Pi is for the old camera. Since Deepwater has their own Pi firmware for the camera we needed to replace the current firmware with the new one. First we rebooted the raspberry pi with the regular pi software, and installed firmware for the Deepwater exploration camera. We were able to see the new camera in the computer's camera list but we still need to see if QGroundControl will recognize the camera.

We also made changes to the cart this month. We used the water jet to cut out two plates that were bent into c shaped brackets. These brackets will hold the blue box and the connecting cable. After we bent the brackets, we mounted the clamps to the cart by drilling holes through the carts aluminum frame and then riveting the c-brackets into place.